Tuesday, October 4, 2016

How can I download videos from YouTube?


This week's tip focuses on how to download videos from YouTube.  Many Instructors use YouTube for their instruction, and YouTube gives you plenty of options to share the links for videos electronically, however, not all videos have a downloading option.  The following tutorial will show you how to download a YouTube video when the download option within YouTube isn't available. *Please note* if the author has blocked the option to download or there are copyright issues involved, you still won't be able to download the video.

To download a YouTube video:


As always, if you have any questions, please contact us in Information Commons at:  (253) 754-3727.

Monday, August 29, 2016

The Different Ways to Communicate With Your Students

There is several ways you can communicate with your students, each way has its pros and cons.  This blog will cover the different ways to communicate with them.

Outlook Email:  

PRO:  You can go into your Outlook through the Portal or the full version on your system.  If you click on the TO: of a new message you can then type in your Quarter and the class to send a message to all of your students through the courses Distribution List. 


This way really doesn’t have a bad side.  You can email just one of your student through searching for their last name int he Address Book or you can email the entire class using this method.  You can add attachments and students can reply back you through their TCC email.  You can CC others to be notified; an example would be any TA’s you have in your course.  You can also BCC the class so the students don’t “Reply All” and send something meant for your eyes only, to the entire class. 
CON:  I guess one Con would be that students cannot use the Distribution List described above.  They would have to put in all of their classmates' names separately.

Canvas Inbox:
Through Canvas you have the messaging center called, Inbox.  

PRO:  Through here you can email your students in your course by sending them a message to All Students or to just one at a time.  You can click on the option to send the same message to each student separately so they don’t Reply All and send you back something meant for your eyes only.  You can also send them an Attachment or a video/audio message using the Canvas Media tool.  When you send this message the students will get a Notification from Canvas in their TCC Student Email if they have set up a Notification to receive messages.  Students can also send a message to the entire class through this system the same way that you can. 


CON:  The Con to this Message System is that you cannot add someone to the TO: list who is not in your course.  You cannot add in a Gmail, Yhaoo Mail, or TCC email address of someone not listed as a TA, Designer or student in your courses.  The other Con is the students have to have the Notification turned on, they also may have to set the Notifications as not Junk.  But the biggest issue is that they have to check their student email in the first place.  The other Con would be that you or a student can reply to the email notification and it will post the reply here in the Inbox, but it will only go to the sender, it will not Reply All.  If you wish to send a Reply All (Question answers about the Snow Day), you will have to log into Canvas and use the Reply All option in the message. 


ctcLink Roster:

PRO:  The final way you can communicate with your students is through the class roster in ctcLink.  With this option you can send a message to the entire class or just to one student.  By default the message is set to BCC the class.  You CC the class with just a copy and paste the list into the CC spot.  When a student replies, the message will go to the email that you have listed in ctcLink. 


CON: The Cons to this system is that the email it will go to is whatever the students have listed as the email in ctcLink.  This could be Gmail, Yahoo , etc.  It could be their parents email or an email that they no longer use.  It all depends on when they filled out the application to the school and what email address they had on it.  With this system you cannot send attachments.  Students cannot use this option at all. 

Canvas Mobile App:

PRO:  Through the mobile app you can send a message to the entire class or just one student at a time.  You can even add attachments or a media attachment.  Students have access to this and can send a message to the entire class. 


CON:  The Con with this is that if you use the Mobile App to reply to the message it is going to Reply All by default.  But you can clearly see at the top of the message that there is more than one recipient.  By clicking on the down arrow, you can see the whole list. 

If you have any questions about the ways to communicate with your students you can submit a ticket through the Learning Network Support or you can send an email to eLearning@tacomacc.edu 


Monday, April 25, 2016

Transcribe video and audio for FREE


Here are some tips on where you could transcribe your audio and video for free and some tools you could use in that process.

Transcribers.

  1. Free Web Speech API from Google. It works with the Chrome browser only though. https://www.google.com/intl/en/chrome/demos/speech.html
  2. Google Docs Voice Typing. It works with the Chrome browser only though. Open a Google Document and instead of typing you could just dictate.

     
  3. Use your phone's voice detection. This works on both Android and iOS devices. Open any app that you use to type notes or even your email. Find the microphone in the on-screen keyboard and either dictate to it or play a video on your PC. Hold the phone close so it would pick up the sound from the PC.

Sound routing tools.

These are tools that will take the sound from any virtual source on your PC and create a virtual output and input. This way you get a much better quality audio to give to the transcribing tool of your choose.
  1. Soundflower works on Mac only and is FREE - https://github.com/mattingalls/Soundflower
  2. Virtual Audio Cable is a paid Windows alternative [$25.50] for routing the sound within your PC hardware. http://software.muzychenko.net/eng/vac.htm#download
  3. Another one for Windows is TotalRecorder [$18] by High Criteria. http://www.highcriteria.com/


Wednesday, March 9, 2016

How to remove student groups from your course


This week's tip will focus on how to remove student groups from your course after the course has ended and you have concluded your course.

Recently, it was discovered that students were able to regain access to their courses even though the course had finished and the Instructors had concluded their course.  They were able to regain access because they were part of a group.  Even though students in groups can't literally click on the course link to access their past courses that you have concluded; because they were in groups (within that course), they are still able to literally click on their group link and have full access to the past course.
Please look at the screenshot below for an example:  Notice how this student doesn't have access to the course in their course section but has access to it via their groups in the "My Groups" section.


To close this loophole and prevent your past students in groups from accessing your past course, you will need to delete the group set.  Removing the group set will accomplish two things: (1) prevents cheating and (2) provides some basic clean up of the student group lists.  To delete the group, do the following:

(1) Go to the course
(2) Click on "People" from the left-hand course navigation
(3) Click on your group set name
(4) Click on the setting icon :
(5) Delete

If you would like more information or you have any questions, please contact us at:  (253) 566-5176.


Thursday, February 11, 2016

Capture the Screen or Portion of the Screen on a Mac

Capture the Screen or Portion of the Screen on a Mac.


To grab your entire screen, on your keyboard, press Command (⌘)-Shift-3.


To grab a part of your screen, on your keyboard, press Command(⌘)-Shift-4. The mouse pointer changes to a cross-hair pointer.

This is how the cross-hair looks like
Move the crosshair pointer to where you want to start the screenshot. Drag to select an area. While dragging, you can hold the Shift key, Option key, or Space bar to change the way the selection moves. When you've selected the area you want, release your mouse or trackpad button. To cancel, press the Escape (esc) key before you release the button. You will find the screenshot as a .png file on your desktop.

Screenshots are saved as .png files on the desktop in Mac OS X v10.6 and later. They're automatically named "Screen Shot date at time.png."

To save your screenshot to the Clipboard instead of a file on your desktop, use Command(⌘)-Shift-Control-4.

Routing sound within the hardware of your Mac: Soundflower

Routing sound within the hardware of your Mac: Soundflower

https://code.google.com/archive/p/soundflower/


Mac OS built-in apps for screen/cam/audio recording: QuickTime X

Mac OS built-in apps for screen/cam/audio recording: QuickTime X

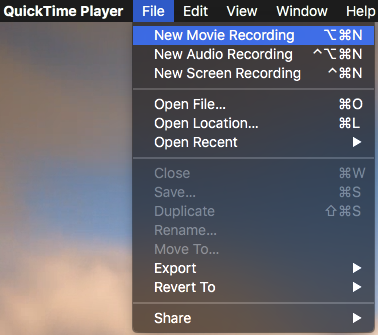
New Movie Recording
Go to File > New Movie Recording and QT X will open a small window shot of yourself and a big red record button at the bottom.
QT X lets you record video using your Mac’s iSight camera. However, what you see is not a mirror image but what the recording will actually look like: move your head to the left and the video will show you moving it to the right.
As you record your video look to the lower right of the control bar and you’ll also see an approximation of how big the final file will be.
This can be useful to know if you plan on emailing or uploading it to Canvas or other services with limited upload capacity.


New Audio Recording
The easiest way to achieve better quality audio recording is using a pair of headphones with a built-in mic like Apple’s headphones. Or you could use a USB microphone such as the Snowball mic. But your Mac’s built-in microphone would do just fine but make sure you sit right in front of your screen.


To record an audio choose File > New Audio Recording.

Choose the audio input of your choice.

As you talk you should see the audio levels move in the bar above the record button. Hit the Record button and talk away.

New Screen Recording
File > New Screen Recording.
This feature does exactly what it means - records your screen and everything that is in forefront. It is somewhat similar to Panopto or Tegrity but is limited in features.

You can also record audio while recording the screen and the mouse clicks.

Choose between recording the entire screen or just a portion of it.

After hitting the record button click and drag on the part want to record, click ’Start Recording' and voila.


NOTE: The only issue I have with QT X’s screen recording feature is that it would not record the audio from the video. You should be able to use the built-in microphone and by putting the volume up but the quality of the sound will be degraded. Here, I’ll mention one app that’s not made by Apple. You can use an app like Google’s Soundflower to route the sound inside your Mac to be able to record it in good, almost original quality.

Exporting
When you’re done recording find the stop button in the upper right side of your screen. It should be placed alongside with your clock, battery, WiFi signal, etc.
The recording will open up and you can play it now.

You can save the video at this point or export it. The two options are practically the same.
Use the export feature if you would like to compress the video to a smaller size.

Editing
QT X could be used to edit any video compressed as a QuickTime codec [mov, mp4, aiff, mp3].
There are a few limited options for editing but two of them are more useful than anything else.

Flip Vertical
Flip your video Horizontally or Vertically. If a recording from your phone shows upside down on your Mac then you could use the Flip Vertical option. You would need to Save or Export the video after this adjustment.

Trim
Trimming is very basic but a bit tricky and I always suggest working with a copy of your original recording. Trimming is 'destructive’ and if you don’t have another copy of the original you won’t be able to revert the changes.
Trimming saves only the selected part of the video and it could be used to cut out the shaky beginning or end of the recording.
You would need to Save or Export the video after this adjustment.